
Fiix CMMS API Developer's Guide
Getting Started
Who this guide is for
Developer Sandbox
Getting API Keys
How to use the API
Using your API Keys in your App
Important Concepts
Code Examples
What is the Fiix CMMS API anyway?
Getting Started
Who this guide is for
Developer Sandbox
Getting your API Access Keys
- Visit your sandbox environment (If you are setting up your API keys in your production environment, please access your production CMMS instance).
- Login as an administrator and go to Settings > Connect Management > MA Connect API Application Settings page.
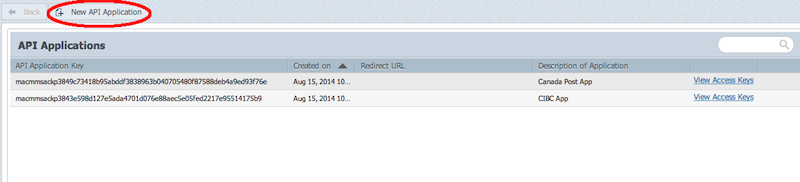
- Register a new API Application by pressing the New Api Application button.
- Enter the description of the app and leave the other fields empty.
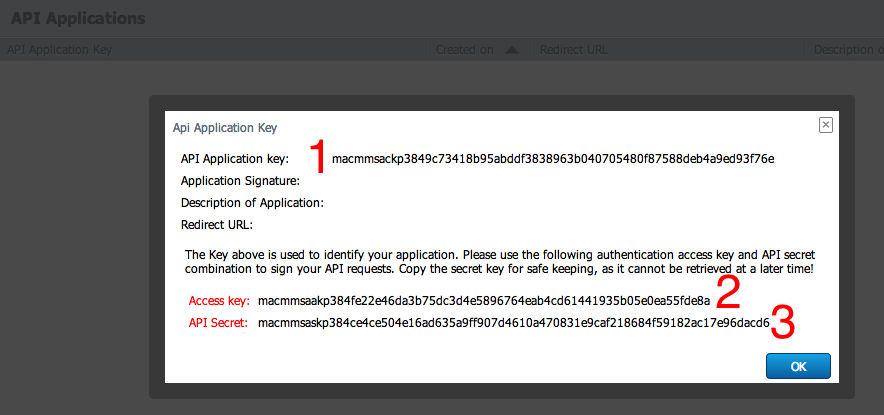
- Click the OK button and then you should be presented with the Application Key (1), Access Key (2) and Secret Key (3). You'll be able to insert these values into your Fiix CMMS Client for accessing the API. Keep the secret in a safe place, as you will not be able to retrieve this value at a later time.
Once you have obtained your API keys, use it together with one of the API Client SDKs.
How to use the API
Using the Java or JavaScript SDK
Using the API Without an SDK
Hooking up your API Access Keys
var fiixCmmsClient = new FiixCmmsClient();
fiixCmmsClient.setBaseUri( '<Your sandbox tenant URL>/api/' );
fiixCmmsClient.setAppKey('Your Application Key');
fiixCmmsClient.setAuthToken('Your Access Key');
fiixCmmsClient.setPKey('Your API Secret');
Configuring in Java is just as easy:
BasicCredentials credentials = new BasicCredentials("APPLICATION KEY HERE","API KEY HERE", "API SECRET HERE");
fiixCmmsClient client = new FiixCmmsClient(credentials, "<Your sandbox tenant URL>/api/");
Concepts
CRUD calls
CRUD calls, or Create,Read, Update and Delete for short, are the basic calls you can do with Fiix CMMS API. These calls will be made to request Objects from the CMMS instance you are working against. For the objects available to the API, you are able to add new objects, update existing ones or even delete, as desired. For a list of all objects and methods available via the API, see the API Reference documentation.RPC calls
The Fiix CMMS API also allows for Remote Procedure Calls from the client side. For example, a call togetDaysOfMonth with the required parameters will return a summary of upcoming events for the specified user. For a list of all RPC calls available via the API, see the API Reference documentation.
Responses from the API
When performing any kind of all to the API, the response from the CMMS will be in a particular format. Ensuring your application handles and parses these responses properly is key to the success of programming against the API. The API delivers responses in a consistent format (depending on your flavour of Fiix CMMS API client), and can containobject and objects for single and multi results of the API calls, respectively. In addition, errors from the server-side will be communicated via the error field of the response object. The errors returned will give you a code to quickly identify the type of error, as well as a brief explanation of what the error was or was caused by. In the case with Batch Requests (see below), responses are batched together, just as they are batched together when sending out the request(s).
Batching Requests
In addition to performing single API calls, the Fiix CMMS API allows for multiple requests to be executed together in a single request to the server. This can optimize the number of network requests needed, as well as client-side programming flows (could reduce complexity of request chaining). See the Batch Request Example section below to learn more.Timeout
Socket timeout values can be applied to the client object to control API call timeout. Below is an example in JavaScript:
fiixCmmsClient.setTimeoutMs(2000);
Below is an example in Java, to specify value for timeout, the ConnectionParams interface needs to be implemented such that the timeout value(s) and the baseUri can be returned in respective implementation methods. An object of the implementation class is then used to create an instance of the FiixCmmsClient.
 //IMPLEMENTING ConnectionParams
import com.ma.cmms.api.client.ConnectionParams;

public class MyConnectionParams implements ConnectionParams
{
	@Override public String getBaseUri()
	{
		return "https://mysubdomain.macmms.com/api";
	}

	@Override public Integer getConnectionTimeout()
	{
		return 2000;
	}

	@Override public Integer getSoTimeout()
	{
		return 4000;
	}
}

//CREATING CLIENT
FiixCmmsClient fiixCmmsClient = new FiixCmmsClient(getCredentials(), new MyConnectionParams());
Proxy Server Information
Proxy server information can be specified for API requests via an implementation of the ProxyCredentials interface. The Basic or the NTLM Authentication scheme can also be used. To specify proxy information, the ProxyCredentials interface needs to be implemented such that it can provide proxyHost, proxyPort, authScheme (BASIC or NTLM), proxyUser, proxyPassword, srcHost and/or domain in respective implementation methods. An object of the implementation class is then used to create an instance of the FiixCmmsClient.
 //IMPLEMENTING ProxyCredentials

import com.ma.cmms.api.client.ProxyCredentials;

public class MyProxyCredentials implements ProxyCredentials
{
	String proxyHost = "localhost";

	int proxyPort = 8888;

	String proxyUser;

	String proxyPassword;

	@Override public String getProxyHost()
	{
		return proxyHost;
	}

	@Override public int getProxyPort()
	{
		return proxyPort;
	}

	@Override public AuthScheme getAuthScheme()
	{
		return null;
	}

	@Override public String getProxyUser()
	{
		return proxyUser;
	}

	@Override public String getProxyPassword()
	{
		return proxyPassword;
	}

	@Override public String getSrcHost()
	{
		return null;
	}

	@Override public String getDomain()
	{
		return null;
	}
}


//CREATING CLIENT
                String API_ENDPOINT = "https://mysubdomain.macmms.com/api";
FiixCmmsClient fiixCmmsClient = new FiixCmmsClient(getCredentials(),
				API_ENDPOINT, new MyProxyCredentials());
Examples
Java Examples
Find Java examples on GitHubJavaScript Examples
Pinging
We are going to start with a very simple example : we are going to ping the API. The API provides two kinds of methods : the RPC method and CRUD methods (change, add, remove, find). For doing a simple ping, we are going to use the RPC method and use the RPC object called "Ping". For more details about this RPC object, check out the reference documentation.// RPC call to Ping
fiixCmmsClient.rpc({
"name": "Ping",
});
// RPC call to Ping with simple callback
fiixCmmsClient.rpc({
  "name": "Ping",
  "callback": function(ret) {
    if (!ret.error) {
      output("You have successfully made your first call to the API.");
    } else output(ret.error);
  }
});
Listing assets
Fiix CMMS is all about managing assets, so one of the first things you might be interested in doing with the Fiix CMMS API is listing assets. To list assets, we are going to use the find method on the Asset object :// find with callback
fiixCmmsClient.find({
"className": "Asset",
"fields": "id, strName, strDescription",
"filters": [{"ql": "intAssetLocationID = ?", "parameters": [408608]}],
"callback": function(ret) {
if (!ret.error) {
output(ret.objects);
} else output(ret.error);
}
});
Here we use a filter to only list the assets at a specific location. Notice how we had to specify what fields we wanted to be returned in the fields parameter. For the complete list of fields available, check out the reference documentation.
This example was useful for listing all our assets. Now let's say we are interested in just one asset. We can then use the method findById to retrieve it :
// findById with callback
fiixCmmsClient.findById({
  "className": "Asset",
  "id": 408677,
  "fields": "id, strName, strDescription, intAssetLocationID, intCategoryID",
  "callback": function(ret) {
    if (!ret.error) {
      output(ret.object);
    } else output(ret.error);
  }
});
Notice how the response object contains integer values for all the relations of the assets (for example intAssetLocationID or intCategoryID). Now, what if we want to build a complete object ready for being rendered ? We need to get the objects corresponding to these IDs. Let's do some more findById requests then.
// Build a complete object
var obj = {};

// Get the asset
var ret = fiixCmmsClient.findById({
  "className": "Asset",
  "id": 408677,
  "fields": "strName"
});

if (!ret.error) {
  obj.asset = ret.object;
}

// Get the associated location factory
var ret = fiixCmmsClient.findById({
  "className": "Asset",
  "id": 408608,
  "fields": "strName"
});

if (!ret.error) {
  obj.factory = ret.object;
}

// Get the associated category
var ret = fiixCmmsClient.findById({
  "className": "AssetCategory",
  "id": 26195,
  "fields": "strName"
});

if (!ret.error) {
  obj.category = ret.object;
}

output(obj);
Now we get a full object with everything we need inside. But notice how we had to make 3 different calls to the API and how we had to do everything in a synchronous way. There is a way to do all this in one request to the API, which we will explain in the next section.
Batching
The Fiix CMMS API provides the possibility of executing several requests as a single batch request. Using batch requests offers several advantages :
- less bandwith is used,
- batch requests are transactional, which means that if one of the request inside of the batch fails, everything is rolled back,
- possibility to do an asynchronous call and to call a callback method once the whole batch has been executed.
We are going to use the same example as in the section above, but we are going to do a batch request :
// Perform a batch request

// Prepare the request for getting the asset
var req1 = fiixCmmsClient.prepareFindById({
  "className": "Asset",
  "id": 408677,
  "fields": "strName"
});

// Prepare the request for getting the associated location factory
var req2 = fiixCmmsClient.prepareFindById({
  "className": "Asset",
  "id": 408608,
  "fields": "strName"
});

// Prepare the request for getting the associated category
var req3 = fiixCmmsClient.prepareFindById({
  "className": "AssetCategory",
  "id": 26195,
  "fields": "subdomain"
});

// Execute the batch
fiixCmmsClient.batch({
  "requests": [req1, req2, req3],
  "callback": function(ret) {
    if (!ret.error) {
      var obj = {
        "asset": ret.responses[0].object,
        "factory": ret.responses[1].object,
        "category": ret.responses[2].object
      };
      output(obj);
    } else output(ret.error);
  }
});
Display values
We have seen above how to retrieve associated objects, which is a good thing. But most of the time, we won't need the full associated object, we just want a display value for it. The API provides a mechanism for that : most of the objects have some extra fields prefixed with dv_ that provide display values for their associated objects. Here is an example :
// Get an asset with display values
fiixCmmsClient.findById({
  "className": "Asset",
  "id": 408677,
  "fields": "strName, dv_intAssetLocationID, dv_intCategoryID",
  "callback": function(ret) {
    if (!ret.error) {
      output(ret.object);
    } else output(ret.error);
  }
});
Notice how the values for the extra fields are enclosed in the extraFields property in the response object.
Adding assets
Now that we have seen how to retrieve content from the CMMS with find and findById, it's time to add our own content. Let's try to add an asset. For this we are going to use a method simply called add :
// Add request
fiixCmmsClient.add({
  "className" : "Asset",
  "fields": "id, strName, strSerialNumber",
  "object" : {
    "strCity" : "Toronto",
    "strNotes" : "Newly created asset via the API",
    "strProvince" : "ON",
    "strName" : "New asset",
    "strInventoryCode" : "AAAX1",
    "qtyStockCount" : 1,
    "strDescription" : "Our new asset",
    "strModel" : "The model of our new asset",
    "strBarcode" : "1111011101110111",
    "strMake" : "The make of our new asset",
    "strSerialNumber" : "1234567890",
    "intSiteID": 408456
  },
  "callback": function(ret) {
    if (!ret.error) {
      output(ret.object);
    } else output(ret.error);
  }
});
Notice how the request is returning the newly created object and how we have to specify the fields we want to be returned like we did for the find request.
Now let's say we need to add a whole bunch of assets. We can do this with a batch request, the same way we did for retrieving several objects.
// Add several assets with a batch request
// Asset  A
var addA = fiixCmmsClient.prepareAdd({
  "className" : "Asset",
  "fields": "id, strName, strInventoryCode",
  "object" : {
    "strName" : "New asset A",
    "strInventoryCode" : "AAAX1",
    "intSiteID": 408456
  }
});

// Asset  B
var addB = fiixCmmsClient.prepareAdd({
  "className" : "Asset",
  "fields": "id, strName, strInventoryCode",
  "object" : {
    "strName" : "New asset B",
    "strInventoryCode" : "BBBX1",
    "intSiteID": 408456
  }
});

// Asset  C
var addC = fiixCmmsClient.prepareAdd({
  "className" : "Asset",
  "fields": "id, strName, strInventoryCode",
  "object" : {
    "strName" : "New asset C",
    "strInventoryCode" : "CCCX1",
    "intSiteID": 408456
  }
});

// Execute the batch request
fiixCmmsClient.batch({
  "requests": [addA, addB, addC],
  "callback": function(ret) {
    if (!ret.error) {
      var obj = {
        "A": ret.responses[0].object,
        "B": ret.responses[1].object,
        "C": ret.responses[2].object
      };
      output(obj);
    } else output(ret.error);
  }
});
Updating an asset
Here is a simple example of how to update an existing object :
// Update an asset
fiixCmmsClient.change({
  "className" : "Asset",
  "changeFields" : "strDescription, strModel, strMake",
  "object" : {
    "id": 408634,
    "strDescription" : "Not the same description anymore",
    "strModel" : "Not the same model anymore",
    "strMake" : "Not the same make anymore",
    "qtyStockCount" : 4
  },
  "fields" : "strName, strModel, strMake, qtyStockCount",
  "callback": function(ret) {
    if (!ret.error) {
      output(ret.object);
    } else output(ret.error);
  }
});
There are a few things to be noticed here :
- Quite obviously, the
idfield is required in the "object" parameter for identifying the object we want to update, - only the fields contained in the
changeFieldsparameter string get updated (notice how theqtyStockCountvalue is not affected by the request), - the request sends back the object that has been updated,
- the fields in the
fieldsparameter string get returned (notice howstrDescriptionis updated but not returned whereasstrNameis returned although it was not updated).
Creating a work order
Now that we have created some assets, we are going to create a work order for one of the asset. We are going to add a WorkOrder object. If you look at the reference for the Asset object, you can see that intSiteID and intWorkOrderStatusId are required fields. First we are going to list the sites using a filtered find request :
// List sites
fiixCmmsClient.find({
  "className": "Asset",
  "filters": [{"ql": "bolIsSite = ?", "parameters": [1]}],
  "fields": "id, strName",
  "callback": function(ret) {
    if (!ret.error) {
      output(ret.objects);
    } else output(ret.error);
  }
});
Please refer to the Filters section of the reference documentation for more details about filters.
Let's list the work order statuses :
// List work order statuses
fiixCmmsClient.find({
  "className": "WorkOrderStatus",
  "fields": "id, strName, intSysCode",
  "orderBy": "intSysCode",
  "callback": function(ret) {
    if (!ret.error) {
      output(ret.objects);
    } else output(ret.error);
  }
});
We are going to use the (No Site) site and the Draft status. We can now create a work order :
// Create a work order
fiixCmmsClient.add({
  "className" : "WorkOrder",
  "object" : {
    "intSiteID": 408456,
    "intWorkOrderStatusID": 13341
  },
  "fields" : "id",
  "callback": function(ret) {
    if (!ret.error) {
      WORKORDER_ID = ret.object.id;
      output(ret.object);
    } else output(ret.error);
  }
});
Associating assets to the work order
We now want to define the assets that are concerned by the work order. We are going to use the association object called WorkOrderAsset.
// Associate a work order with assets

if (!WORKORDER_ID) output('Create a work order first');

// Associate it with one asset
var addFirst = fiixCmmsClient.prepareAdd({
  "className" : "WorkOrderAsset",
  "object" : {
    "intWorkOrderID": WORKORDER_ID,
    "intAssetID": 408488
  },
  "fields" : "id"
});

// Associate it with a second asset
var addSecond = fiixCmmsClient.prepareAdd({
  "className" : "WorkOrderAsset",
  "object" : {
    "intWorkOrderID": WORKORDER_ID,
    "intAssetID": 408489
  },
  "fields" : "id"
});

// Execute the batch
fiixCmmsClient.batch({
  "requests": [addFirst, addSecond],
  "callback": function(ret) {
    output(ret);
  }
});
Creating work order tasks
Now that we have a work order associated with assets, we are going to create some tasks inside of it. Tasks are represented by the WorkOrderTask object. We are going to assign the task to one of the user with the intAssignedToUserID fields.
// Create some tasks

if (!WORKORDER_ID) output('Create a work order first');

var task1 = fiixCmmsClient.prepareAdd({
  "className": "WorkOrderTask",
  "object": {
    "intWorkOrderID": WORKORDER_ID,
    "intAssetID": 408488,
    "intTaskType": 0,
    "intOrder": 0,
    "intAssignedToUserID": 32741
  },
  "fields": "id"
});

var task2 = fiixCmmsClient.prepareAdd({
  "className": "WorkOrderTask",
  "object": {
    "intWorkOrderID": WORKORDER_ID,
    "intAssetID": 408489,
    "intTaskType": 0,
    "intOrder": 1,
    "intAssignedToUserID": 32742
  },
  "fields": "id"
});

// Execute the batch
fiixCmmsClient.batch({
  "requests": [task1, task2],
  "callback": function(ret) {
    output(ret);
  }
});
For convenience purpose, the WorkOrder object has some special fields for accessing associated assets and users directly. This way, we can check the associations we have just created :
// Retrieve work order with associated users and assets

if (!WORKORDER_ID) output('Create a work order first');

fiixCmmsClient.findById({
  "className" : "WorkOrder",
  "id": WORKORDER_ID,
  "fields" : "id, strAssetIds, strAssets, strAssignedUserIds, strAssignedUsers",
  "callback": function(ret) {
    if (!ret.error) {
      output(ret.object);
    } else output(ret.error);
  }
});
Uploading a file
In order to upload a file to an object via a HTTP call, use the uploadFile method as in the below example. This will upload an empty file into an Asset and WorkOrder object identified by sourceIdString.
Do note that the actual logic to fetch the file via a form will need to be implemented by the client.
        const assetUploadFile = "";
        const woUploadFile = "";
        var descriptionArray = [{
            sourceInfo : "ASSET_INFO",
            sourceIdString: "512",
            fieldName : "assetUploadFile"
        },
            {
                sourceInfo : "WORK_ORDER_INFO",
                sourceIdString: "1",
                fieldName : "workUploadFile"
            },
        ];

        const result = fiixCmmsClient.uploadFile(
            {
                "descriptions" : descriptionArray,
                "assetUploadFile": assetUploadFile,
                "workUploadFile": woUploadFile
            });